Black Pepper Beef Sliders

Here we go with the Cantonese-inspired sliders series #2! What did you think of the sweet and sour chicken sliders I posted a couple days ago? If you're reading this, I take it that you're interested to find out this next one I have for you as part of the sliders series? In that case, I'm seriously thrilled that you're here! And if you just happened to stumble upon this post, I'm glad that you're here too!

Do you rememeber a while ago I shared with you a recipe for Hong Kong style black pepper sauce? Well, today we're putting that to use. Black pepper sauce is quite common on the menu at tea restaurants and western-style restautants in Hong Kong. It's a sauce that usually goes along with grilled chicken or steak/beef, often served on a bed of white rice or spaghetti. I obviously grew up loving the dish so how could I not put that to use when I'm crafting some Cantonese-inspired sliders!?

And no, neither there is spaghetti in these sliders nor the buns were made out of rice. I'm not that crazy (but maybe I should be)? You be the judge, and let me know in the comments below! Beside black pepper sauce, Hong Kongers are quite fond of beef brisket which is what I used for these sliders. Even on a hot summer day, locals enjoy their beef brisket noodle soup 牛腩麵 (sometimes with a side of wontons) while taking shelter from the scorching hot weather with blasting air-con indoors. Beef brisket is also commonly enjoyed with curry (Curry Beef Brisket 咖喱牛腩) or with choy sum (菜遠牛腩).

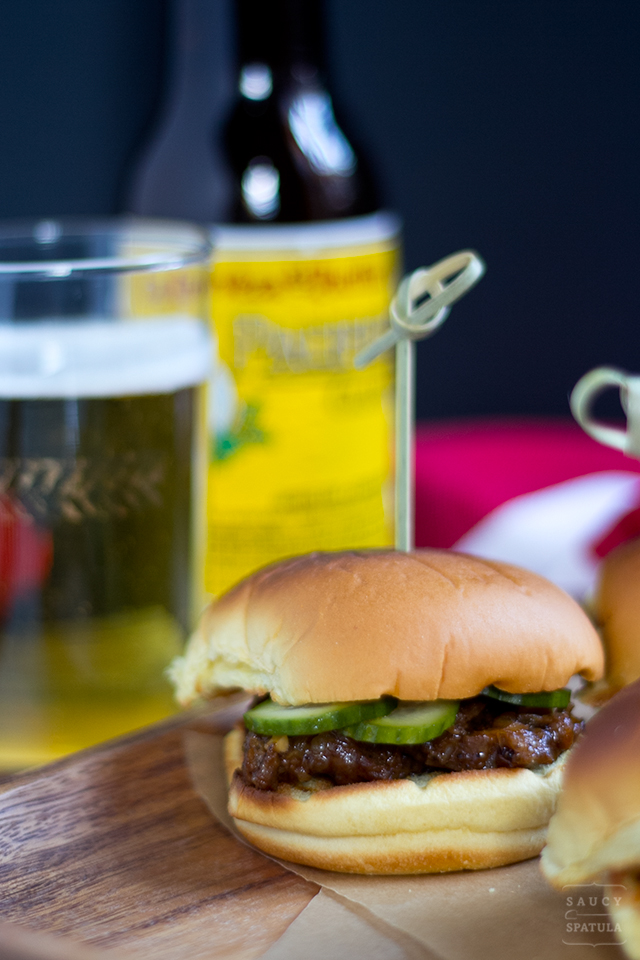
When I thought of making beef sliders, brisket just came to my mind like second nature since it's my favorite cut of beef. I think matching it with black pepper sauce and some homemade pickles was a wise choice, and the flavors came out just right!

So kick back, and enjoy a beer with these Black Pepper Beef Sliders!

Don't forget to check out Part 1 of the Cantonese-inspired sliders series:
 Sweet and Sour Chicken Sliders

Black Pepper Beef Sliders

Prep time: 5 hours 10 mins  Cook time: 30 mins  Total time: 5 hours 40 mins

Serves: 6

You'll need:

  • 6 Martin’s “sliced potato rolls”
  • 1 lb beef brisket
  • some homemade pickles
  • Marinate:
  • 1 tbsp olive oil
  • 1 tbsp garlic, minced
  • 3/4 cup yellow onion, finely chopped
  • 1 tbsp shaoxing (紹興) rice wine
  • 3 tbsp ketchup
  • 1/2 tbsp Worcestershire sauce
  • 1/4 cup soy sauce
  • 1/4 cup water
  • 1/2 tbsp freshly ground black pepper
  • 1 tsp sugar

Approach:

  1. Cut beef brisket into 2″ strips, then arrange them in a baking dish or toss them in a large ziplock bag.
  2. Combine marinate ingredients.
  3. Pour 2/3 of it into the baking dish or ziplock bag with the brisket, and give it a quick stir. Refrigerate for 5-6 hours, and give it another stir mid-way through.
  4. minutes before you’re ready to cook the brisket, remove it from the fridge, and let it sit and return to room temperature.
  5. Using a sauté pan on medium-high heat, cook the brisket for 10 minutes with all of its marinate. Then, cover with lid and simmer for another 20 minutes. Taste test the tenderness of the meat from time to time. In my experience, the longer you cook a brisket, the more tender it gets.
  6. Remove brisket from the pan, leaving the sauce. Let the meat rest for a few minutes on the cutting board before slicing.
  7. Pour the rest (1/3) of the marinate into the pan, let it simmer until the onion has soften and the sauce has thickened.
  8. Toast 6 buns in the toaster oven (butter lightly if you like).
  9. To assemble, take slices of brisket, top with sauce and then some pickles.
  10. Serve immediately (like now!)

Sweet and Sour Chicken Sliders

Helloooo summer! What have you done so far to celebrate the return of summer? Have you jumped into the water yet? Gone on any road trips? Had any picnics at the park with friends? Speaking of picnics, I've got an idea for you the next time you're needing to make something to bring to a picnic. For the next couple weeks, I'll be rolling out four Cantonese-inspired sliders recipes. I'm taking inspiration from some classic Cantonese dishes and turning them into a bao form! Are you ready to find out more about the first one in the series?

If you liked my sweet and sour pork (咕嚕肉) last time, you'll love these sweet and sour chicken sliders even more! Why? Because it‘s made with fried chicken wings! Yes... you heard it correctly. There's something so satisfying about fried chicken wings. Agree? It's the super crispy and crunchy skin that keeps winning every single time. I used my go-to fried chicken recipe (heavily adapted from Kenji's), and was again blown away by the result. Thank you Kenji! After frying the wings, I let them cool down for a few minutes before deboning them. Give them a rough chop on the cutting board and now they're almost ready to go on the bun.

To complete the full sweet and sour chicken experience, how can we forget the pineapple, bell peppers, and homemade sweet and sour sauce?

Voilà.

Take a bite of this classic Cantonese dish with a twist. And don't forget to come back later this week for the Cantonese-inspired sliders series no.2!

Sweet and Sour Chicken Sliders

Prep time: 15 mins  Cook time: 40 mins  Total time: 55 mins

Serves: 6

You'll need:

Approach:

  1. Slice pineapple and bell peppers. Make sweet and sour sauce. Set aside.
  2. Fry chicken wings by following the direction on my fried chicken recipe. After frying, let chicken cool down for a few minutes then debone and chop up roughly.
  3. Toast 6 buns in the toaster oven (butter lightly if you like).
  4. Toss the chopped up fried chicken along with sliced bell peppers in a medium mixing bowl. Drizzle with sweet and sour sauce, and combine well.
  5. To assemble, lay pineapple ring on each bun, and top with sweet and sour fried chicken.
  6. Serve immediately.

Kenji's Crispy Crunchy Fried Chicken

I know you love fried chicken. You know you love fried chicken. Deep frying anything at home can be a pain in the butt, and handling boiling hot oil can be intimidating. So if you are ever going for the task of frying up some chicken at home, might as well do it the right way to make sure what ends up on your plate will be truly rewarding – crispy and crunchy on the outside and juicy on the inside! And here's how you do it. I do have to say, Kenji from Serious Eats really taught me everything about deep frying chicken which involves a lot of science that I was sucked into reading. I appreciate so much of how far he had gotten in finding out the best way to fry chicken, and sharing the knowledge with the world. Therefore, 95% of the credit of the recipe goes to Kenji (I just heavily adapted it to my liking). What his recipe produces is a thin crackling skin that's super crispy. With that being the goal, here are the steps to follow:

1) Pre-treat the chicken. Why? Because fatty chicken skin simply will not stick to the batter. But what do you treat it with exactly? WRITE THIS DOWN. Corn starch + salt + baking powder. After coating all the pieces, you let them air-dry for about 20 minutes.

2. Mix some batter just before you're ready to fry. If you've deep-fried things before, you know the batter requires flour. That's true. But it also requires corn starch. Too much flour will create too much gluten, and too much gluten means "tough or leathery crusts". On the other hand, too much corn starch will make a powdery coating, and creates little browning. Therefore, a 50/50 mix is what you're looking for. Now, we're not done just yet. To make a lighter, crispier, and crunchier coating, you need to add baking powder which will help with the browning as well. But don't go crazy on it, just a touch is needed.

3. The secret weapon. VODKA. What it does is pure magic (okay, maybe not quite magic since it's science that can be proofed). Alcohol limits gluten development while the battered chicken is swimming in hot oil. Secondly, by adding vodka, you're creating a "drier" batter which will aid with evaporation and dehydration tremendously when frying, resulting in a bubbly surface and a crunchier texture of the chicken.

Regular batter mixed purely with water forms gluten as it sits. This batter mixed with vodka limits gluten development so it's got a longer shelf life, which means you don't need to keep an eye on it every minute.

So there you have it. Perfect bubbly, crispy, crunchy fried chicken.

Thank you, Kenji!

Kenji's Crispy Crunchy Fried Chicken

Prep time: 35 mins  Cook time: 30 mins  Total time: 1 hour 5 mins

Serves: 20 wings

You'll need:

  • 5-6 cups canola oil (or peanut oil)
  • Pre-treatment:
  • 1 tsp salt
  • ¼ cup corn starch
  • ½ tsp baking powder
  • 2 lbs chicken wings, about 20 mid-section wings
  • Batter:
  • ½ cups corn starch
  • ½ cup all-purpose flour
  • ½ teaspoon baking powder
  • 1 tsp salt
  • ½ cup cold water
  • ½ cup vodka

Approach:

  1. Mix together the pre-treatment ingredients. Pat dry the chicken wings with paper towels then coat each piece with the pre-treatment mixture, shake off excess coating. Lay them on a wire rack, uncovered, and air-dry for about 20 minutes.
  2. When you're ready to fry, set up your deep-fry thermometer, preheat oil to 350°F in a wok, sauce pan, cast iron pan or Dutch oven.
  3. While waiting for the oil to heat up, get the batter ready by mixing the dry ingredients first, then whisk in water and vodka.
  4. Coat 4-5 wings with the batter at a time. Using a pair of chopsticks, lift each piece one at a time and gently shake off excess batter. Carefully lower it into the oil. Fry each batch for about 6 minutes until golden brown. Use another clean pair of chopsticks to remove chicken from the hot oil, and set them on a paper towel-lined plate to cool off.

Notes:

Recipe adapted from SeriousEats.

Homemade Pickles

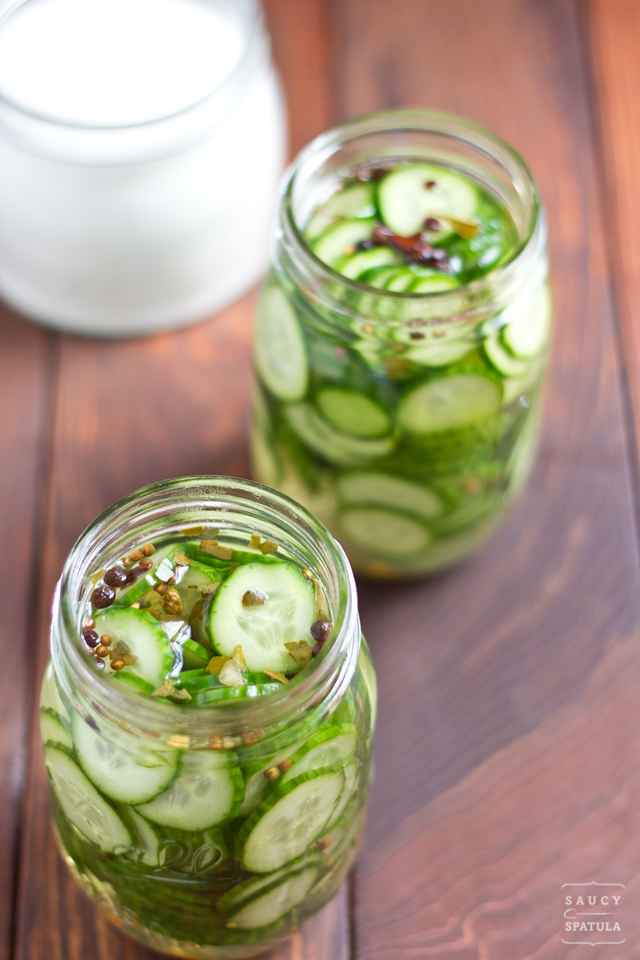
Pickles are quite a staple at our household. We eat them with sandwiches or just something to snack on in between meals. Most of the time, I get store-bought dill pickles but once in a while, I like to make some homemade pickles that is quick and easy.

The technique of pickling is quite an art form that can be traced back thousands of years ago. Almost every culture have mastered their own kind of pickling. Koreans with their kimchi, Chinese with their salted mustard greens, Italians with their giardiniera, Scandinavian with their pickled herring, Middle Eastern with their mekhallel. Pickling sure was big before refrigeration was invented. While I'm fascinated by different kinds of pickling, sometimes I just crave for some simple, homemade pickles!

Coming from a Chinese Hakka background, pickling was a big part of the Hakka cuisine because Hakkas were always finding ways to preserve food as they used to travel for long distances. Then as farmers, Hakkas would save up their surplus food supplies by pickling. Some of the most common Hakka preserved foods are pickled mustard greens, preserved mustard greens, fermented black beans, red fermented tofu, salted radish, and of course soy sauce. My grandfather's favorite Hakka dish, Braised Pork Belly with Red Bean Curd (南乳燜猪肉), uses red fermented tofu.

Okay, back to pickles. Let's start with some kirby cucumbers, shall we?

Using a Mandoline Slicer, choose the thickness to your liking, and slice away! (Please watch your fingers. Pleeeeease!)

I usually let the pickles sit in the fridge for 2 days before serving. It will retain its texture and flavor for up to a week.

Homemade Pickles

Prep time: 2 days 10 mins  Cook time: 5 mins  Total time: 2 days 15 mins

Serves: 2, 16-oz jars

You'll need:

  • 6 kirby cucumbers, about 2 cups
  • 1½ cups water
  • 1½ cups white vinegar (or apple cider vinegar)
  • ½ cup + 2 tbsp granulated sugar
  • ½ tbsp salt
  • 1 tbsp Mccormick mixed pickling spice

Approach:

  1. Using a mandoline slicer, carefully slice all 6 cucumbers.
  2. Place sliced cucumbers into jars, filling almost to the top.
  3. Pour the rest of the ingredients in a small sauce pan, heat on the stove over low heat until sugar and salt has completely melted, then turn off heat immediately. Let vinegar mixture cool completely.
  4. Using a ladle and a funnel (or a ladle with pour spout), fill the jars with the vinegar mixture.
  5. Refrigerate for at least 2 days before serving. Pickles will retain their texture and flavor for about a week.

Fried Shrimp Dumplings (炸蝦角)

There are three things I love and consider comfort food: noodles, dumplings, and wontons. Eat them separately? Eat them together? Egg noodle? Rice noodle? Pan-fried dumplings? Boiled dumplings? Soup dumplings? Eat them plain? Dip in soy sauce? Vinegar? Chili oil? I'm ALL IN. And most of the above is pretty easy to make at home. Then, it comes the fried dumplings that you may see at dim sum.

It's not that deep-frying is hard to do at home but it's just kind of a pain in the butt. Agree? But I decided to do it anyway because I was craving these little fried shrimp dumplings like there was no tomorrow. The trick in making restaurant-quality shrimp dishes is the shrimp. (DUH). Just what do Chinese restaurants do to make shrimp taste so good? The answer is in the texture which is written all over Chinese food. It's all about 口感 (mouth feel) - crunchy, soft, "springy" (彈牙), chewy, smooth, tender, etc... If you've had shrimp from a Chinese restaurant before, you'd notice that the shrimp tastes somehow "crunchier" in an interesting way. I was curious in just how such thing is accomplished so I started poking around for answers. Then, I stumbled upon a post written by Bee over at Rasa Malaysia. To sum up her research, treating shrimp and achieving a pH8 to pH9, which is considered alkaline, will make a crunchier texture. Cold tap water is usually alkaline with close to pH9. And that's why restaurants run cold water on shrimp. "Sea water is pH8 and the reason why live/raw shrimps have firm and crunchy flesh". Bee went further to test another method, that's used at some restaurants, of adding egg white (ph8), tapioca starch, and baking soda (ph8). It turned out to be a success, and it has been her go-to technique for preparing shrimp for stir-fries and whatnot. The only thing about this technique is that it requires 5-6 hours to marinate so plan ahead.

Gosh! Don't you love knowing food science? Or is it just me? Thanks Bee for sharing your findings.

Now, if you want the end product of the shrimp dish to have whole shrimps, then I'd suggest that you give Bee's technique a try. However, for these Fried Shrimp Dumplings (炸蝦角), I was looking for another texture that fried shrimp rolls (炸蝦卷) at dim sums offer. For that, it requires a shrimp paste that's commonly referred to as Ha Kaw (蝦膠) which describes a shrimp paste that's springy or stretchy. But what the heck? How do you do that? Just hold on a second and let me explain before you decide to bail on me! What you really need is to get your hands dirty by mixing the ingredients by hand. If you can do that, you can make Ha Kaw (蝦膠). Yea, sure. You may try using a hand/stand mixer instead but you'll miss out on the fun! Besides, your hands are mandatory in the last step so you might as well get them dirty now. After mixing the shrimp paste together (stirring in one direction continuously), form it into a ball shape. Take it with one hand, then smack it back into the bowl. Repeat that 10 times then it's ready to be used as filling.

For deep-frying, it's handy to have a cooking thermometer so you can keep track of the oil temperature. Something like this from Sur la Table would be ideal because it's got a clip that holds it securely to the pan during frying.

Like spring rolls at dim sum, these fried shrimp dumplings are commonly served with worcestershire sauce (but sometimes served with mayonnaise instead). It's definitely one of my favorite dim sum dishes of all time!

Fried Shrimp Dumplings

Prep time: 35 mins  Cook time: 20 mins  Total time: 55 mins

Serves: about 24

You'll need:

  • 1 lb medium raw shrimp, shelled and deveined
  • 2 egg whites
  • 2 tbsp olive oil
  • ½ tsp salt
  • ½ tsp white pepper powder
  • 1 tsp sesame oil
  • 30 round wonton wrappers
  • 2 cups vegetable oil for frying

Approach:

  1. After peeling and deveining the shrimp, raise it under cold water for a few minutes, then pat dry with paper towels.
  2. Using the blade of a chef knife, lay it flat and mash the shrimp one by one by putting force down. Then push it to the side of the chopping board. Once all the shrimp has been mashed, give it a few more chops to make sure the consistency is good. Place it all in a big mixing bowl.
  3. Add egg whites, olive oil, salt, white pepper powder, and sesame oil. Run your fingers clock or counter-clock wise until everything is well-blended together. Then form it into a ball shape. Take it with one hand, then smack it back into the bowl. Repeat that 10 times. Cover the mixing bowl with plastic wrap, refrigerate for one hour.
  4. Damp a paper towel and cover wonton wrappers when not in use, and place a small bowl of water at your work station.
  5. Spoon about 1 tbsp of filling onto the middle of the wonton wrapper. Dip your finger in water and run it on the outskirt of half of the wrapper. Pinch the middle point on top, and make pleats on both sides. The tighter you can wrap a dumpling the better.
  6. In a 5-6 quart sauce pan, heat vegetable oil to 350°F over medium-high heat. Carefully monitor your oil temperature. Fry no more than 4 dumplings at a time. Fry each side for about a minute and a half, until golden brown. Place cooked dumplings on a plate lined with paper towels.
  7. Serve fried shrimp dumplings with worcestershire or mayonnaise as dipping sauce.

Hakka Stuffed Tofu (釀豆腐)

The fact that I am Hakka but have not yet featured a Hakka recipe on the blog is simply a crime. I can't say that I learned everything that I know about Hakka cooking from my Ah Gong (grandfather) who cooked and used the kitchen way more than my Po Po. But I can say that my desire to cook was partly influenced by him. And if you know me, you'd understand my craze for feeding a crowd. All that, was much influenced by my gigantic Hakka family. I mean, how can I not when I basically saw my entire extended family every, single, weekend growing up? A house full of 25-30 people? Checked. Food? DOUBLE CHECKED!

Being a Hakka in Hong Kong isn't all that out of the ordinary. There are many Hakka villages spread around the New Territories that are very much populated. People move around as lands develop so Hakkas living outside of villages are becoming very common these days. While a reasonable amount of Hong Kong-born-and-raised Hakkas had moved overseas, the Hakka tradition lives on with a handful of regular celebrations and gatherings throughout the year.

Have I bored you yet with my mumbo jumbo? Let's go back to the topic of today and talk food! You can certainly read more about my Hakka heritage in the Proud to be Hakka post I wrote a while back!

There are many classic Hakka dishes like the Stuffed Tofu (釀豆腐) that people would consider or have mistaken as Cantonese. The truth is, both cultures share a lot of similarities in cooking, and have been adapting and borrowing from each other for quite some time. With its rich migration history, dishes like Stuffed Tofu (釀豆腐) travels with the Hakka people wherever they land. To me, food is always about adapting and that's what makes food universal and interesting. When Hakkas take dishes with them to live somewhere else, they adapt local flavors, ingredients, and techniques. According to Linda Lau Anusasananan, when the Hakkas moved to southern China a long time ago, wheat wasn't widely available to make dumpling wrappers so they adapted by using tofu instead.

I don't expect Stuffed Tofu (釀豆腐) in other Hakka-influenced Chinese communities around the world to be all the same. The standard and common ingredients for Stuffed Tofu (釀豆腐) requires, of course, tofu. The filling is mostly pork but it can sometimes be mixed with fish or shrimp. The filling can also be used to stuff other vegetables like bell peppers and eggplant. While some people stuff the filling with tofu pockets, I always like to make the open-face version of Stuffed Tofu (釀豆腐). For sauces, soy sauce is used most of the time as well as oyster sauce, and fish sauce for Hakka Chinese who had migrated to South East Asia. Some like to steam, others prefer to deep-fry (I like to pan-fry), and each cooking method has its own beauty really. You could also choose to make a braised stuffed tofu dish after the tofu has been fried. Pan-frying, for me, produces the right balance of slightly crispy on the outside and soft on the inside. It's really one of the perfect ways, one of my favorite ways, to eat tofu.

Learn more about Hakka cooking, culture and history from Linda Lau Anusasananan in The Hakka Cookbook. Available on Amazon.


Hakka Stuffed Tofu (釀豆腐)

Prep time: 35 mins  Cook time: 5 mins  Total time: 40 mins

Serves: 12 pieces, 2"x2"

You'll need:

  • 1 lb (1 block) firm tofu
  • ½ lb ground pork
  • 1½ tsp minced fresh ginger
  • 2 tsp Shaoxing cooking wine
  • 3 dashes of white pepper powder
  • ½ tsp salt
  • 1 tsp sesame oil
  • 2 stalks scallions, finely chopped
  • ½ cup corn starch

Sauce:

  •  ½ cup chicken stock
  • 1 tbsp oyster sauce
  • 1 tbsp soy sauce
  • ½ tbsp dark soy sauce
  • 1 tsp corn starch and 2 tbsp water, mixed

Garnish:

  •  1 stalk scallions, finely chopped

Approach:

  1.   
  2. Extract excess water from tofu by sandwiching it with few sheets of paper towels on a plate (underneath and on top of tofu). Using something considerably flat and heavy, gently place it on top and center of tofu for about 10 minutes.
  3. Mix ground pork with minced ginger, cooking wine, white pepper powder, salt, sesame oil, and scallion.
  4. Prepare, and set aside the ½ cup of corn starch in a medium size bowl (for coating tofu later before frying).
  5. Prepare the sauce by heating up sauce ingredients (minus the corn starch mixture). Once it starts to boil, turn the heat down to simmer. Stir in corn starch mixture slowly which will start to thicken up the sauce. Continue stirring for another 30 seconds, then turn off the heat.
  6. Slice tofu into 12 pieces. Then make a cavity in each piece using a teaspoon as a scoop. Save tofu scraps for another use if you wish. Stuff each tofu with roughly 1 tbsp of pork filling.
  7. Heat up a cast iron pan with some oil. Carefully pick up stuffed tofu pieces, and coat them with corn starch on all sides (shake off the excess gently). Place them on the hot pan with filling side down. Cook for about 2 minutes, then flip them over with a spatula and cook for 2 more minutes. Add more oil to the pan as needed.
  8. Plate, then sauce. Garnish with finely chopped scallion. Serve immediately.

Chinese Tea Eggs (茶葉蛋)

Tea eggs (茶葉蛋), also known as marbled eggs, is such an iconic Chinese snack that's not only common in mainland China but also in Hong Kong, Taiwan, Malaysia, and pretty much most Chinese communities. Growing up, I would see them being sold in food storefronts, usually next to other street food like gai daan jai (鷄蛋仔 or egg waffles), curry fish balls, fish siu mai, and other fried goodies. Some restaurants in Chinatown would have tea eggs on the menu too, if you're in luck. While tea eggs are sold more commonly by street vendors in mainland China (and often eaten as breakfast), you can also see them sold in 7-elevens and night markets in Taiwan.

The flavor of tea eggs is quite unique built up by some really good spices like cinnamon, star anise, and dried orange peel, along with the infused liquid by soy sauce and tea. It sounds kind of fancy, doesn't it?

^ This is why they're also called "marbled eggs" because of the pattern it creates on the surface of the egg during the cooking process.

Get your liquid and spices going by heating it up in a pot. Bring it to a boil then leave it to simmer.

In another sauce pan, we're pre-boiling the eggs. Put your eggs in and fill water up to 1" over the surface of the eggs. Turn on the heat, add 1 tsp of salt, and let it cook until it's reached the boiling point. Once water starts to boil, turn off the heat, and let the eggs sit in the hot water. Cover with lid, and set your timer for 8 minutes. (A perfect hard-boiled takes 13 minutes, but we're PRE-boiling here.)

Drain them out of the hot water and put them in an ice bath for about 5 minutes (or run them under cold water).

Using the back of a butter knife, crack the egg all around but leave the shell on.

After you're done cracking all the eggs. Turn off the heat on the simmering liquid, place the eggs in the pot with the lid on. Let the eggs marinate overnight (transfer pot to the fridge once it has cooled down completely). When you're ready to serve them the next day, simply reheat (but not boil).

It's possible to leave the eggs to marinate for a shorter amount of time (at least 4 hours). However, eggs will not be as flavorful as they would being marinated overnight.

You can eat tea eggs plain or cut them in halves and serve them with a bowl of noodle soup!

Chinese Tea Eggs (茶葉蛋)

Prep time: 20 mins  Cook time: 4 hours  Total time: 4 hours 20 mins

Serves: 9 eggs

You'll need:

  • Pre-boiling:
  • 9 eggs
  • Fill water up to 1″ above surface of eggs
  • 1 tsp salt
  • Liquid:
  • 6 cups water
  • 3 tbsp loose pu-erh tea leaves (普洱茶)
  • 1 cinnamon stick
  • 3 star anise
  • 4 1/2 tbsp light soy sauce
  • 1 1/2 tsp dark soy sauce
  • 1 1/2 tbsp light brown sugar
  • 1/2 tsp whole black peppercorn
  • A couple pieces of dried orange peel (store-bought or homemade)

Approach:

  1. Get your liquid and spices going by heating it up in a pot or sauce pan. Bring it to a boil then leave it to simmer.
  2. Pre-boil the eggs in another pot by filling water up to 1″ over the surface of the eggs. Turn on the heat, add 1 tsp of salt, and let it cook until it’s reached the boiling point. Once water starts to boil, turn off the heat, and let the eggs sit in the hot water. Cover with lid, and set your timer for 8 minutes. (A perfect hard-boiled takes 13 minutes, but we’re PRE-boiling here.)
  3. Drain them out of the hot water and put them in an ice bath for about 5 minutes (or run them under cold water).
  4. Using the back of a butter knife, crack the egg all around but leave the shell on.
  5. Turn off the heat on the simmering liquid pot, place the eggs in the pot with the lid on. Let the eggs marinate overnight (transfer pot to the fridge once it has cooled down completely).
  6. When you‘re ready to serve them the next day, simply reheat (but not boil).

Notes:

It’s possible to leave the eggs to marinate for a shorter amount of time (at least 4 hours). However, eggs will not be as flavorful as they would being marinated overnight.

Pan-fried Noodles with Soy Sauce (豉油皇炒麵)

What is a classic dish? Something traditional? Something that has survived through time that this ever-changing culture does not get tired of? Something so good, and so true to an identity that it has been stamped with a "no further modification needed"? Classic dishes live among all cuisine, and for the Cantonese, this Pan-fried Noodles with Soy Sauce (豉油皇炒麵) is definitely one of them.

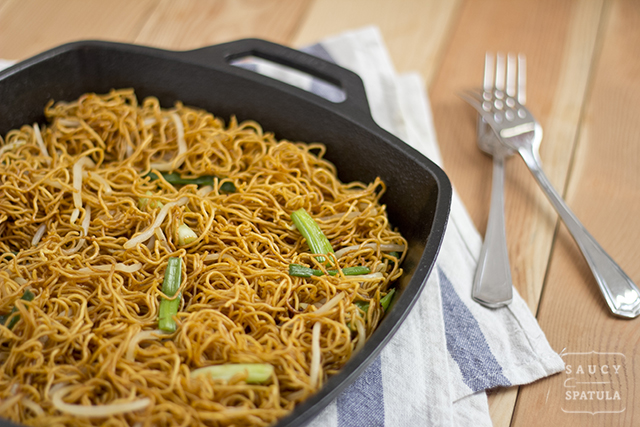
Noodle is everything in a lot of Asian people's diet. Okay, a majority if not everything. I had recently pointed out my love for noodles. And if you must know, I eat some sort of noodle at least once a week (twice, if you count pasta). Anyway. What I admire about dishes like the pan-fried noodles with soy sauce is that it holds the ability to keep its cool over the years, sort of like flying low under the radar. The dish has not changed and very rarely you'd get a modified version. Pan-fried noodles with soy sauce is as basic and simple as a stir-fried noodle dish can get. There're only four things you need to make this authentic dish: egg noodles (either dried or fresh), bean sprouts, scallions, and soy sauce. (Well, two kinds of soy sauce.) It's not a fancy dish, and it doesn't need to be. Ever.

If you're traveling to the "kong", you'll come across pan-fried noodles with soy sauce in a lot of places. Almost all jau lau 酒樓 (big restaurants that can hold lots of banquet-size tables and mainly serving Cantonese cuisine and Dim Sum), Da Pai Dong, Cha Chaan Teng, fast food places like Café de Coral (大家樂) or Fairwood (大快活), and congee shops. Congee is pretty much the partner in crime to pan-fried noodles with soy sauce. The perfect match for locals who prefer a Chinese breakfast today because a western style breakfast was eaten yestetday.

Many Asian cultures eat noodle or rice for breakfast. Singaporean has their bee hoon, and Vietnamese has their bun. In Cantonese, calling someone a "rice bucket" simply means that person eats a lot of rice. I'm definitely the noodle version. Does that make me a "noodle bucket"? That just sounds ridiculous.

Slurp. Slurp.


Pan-fried Noodles with Soy Sauce

You'll need:

  • ½ lb egg noodles, dried or fresh (pan-fried not wonton noodles)
  • 3 stalks of scallion, cut into 1" pieces
  • ½ cup bean sprouts, rinsed
  • 1 tbsp dark soy sauce
  • 2 tbsp regular soy sauce
  • Some oil

Approach:

  1. If using dried egg noodles, blanch them in hot water first until el a dante. It'll take about 3 mins after water has boiled. Drain, and set aside.
  2. In a hot pan, add 2 tbsp of oil. Rotate the pan to spread oil throughout the cooking surface. Add noodles and cook for about 4 minutes, stirring frequently with a pair of chopsticks or tongs. Then add scallion, bean sprouts, and both kind of soy sauce. Stir and cook for 4 more minutes. Serve immediately.

Notes:

If you encounter dryness while cooking the noodles, add water 1 tbsp at a time.

Iced Red Bean with Coconut Milk (椰汁紅豆冰)

Spring has finally arrived! In order to celebrate the return of warmth and the coming sweaty days, I decided to share with you an original Hong Kong summer dessert/drink - Iced Red Bean 紅豆冰 (with coconut milk). This is a drink that people usually don't make at home so you're in for a treat (no pun intended)! So if it's not made at home, then where do Hong Kongers go to get their Iced Red Bean?

Iced Red Bean was first created in a type of restaurants in Hong Kong known as Bing Sutt (冰室). The direct translation of the term is "ice room". Why "ice room" you may ask? Well, Hong Kong's climate is generally quite warm with summers that could be unbearable. Bing Sutts are places where people can pop in and out to get a cool drink in the 90°F summers (plus humidity)! So how do you know if you've walked into a Bing Sutt? Small tile floors, hanging fans, folding chairs, booth seatings are the characteristics of a typical Bing Sutt decor. Bing Sutts gained popularity in the 50's and 60's because they provided the working-class localized western meals at affordable prices, and they are mostly located in residential areas and neighborhoods making Bing Sutts great places for people of all social status to gather and to cool off! Bing Sutt eventually started serving food outside of their localized western menus to stay competitive with Cha Chaan Tengs (which I consider as the next generation of Bing Sutts). If you happen to pass by a Bing Sutt while visiting Hong Kong, I highly recommend that you pop in for a tea or coffee as there're not too many Bing Sutts left in the "kong" as real estate prices soar making mom-and-pop shops to fold one after another.

A traditional Ice Red Bean is made with three things: sweetened and cooked red beans, evaporated milk, and crushed ice. If you're not familiar with Asian or Chinese desserts, red or green beans are often made into sweets in various forms. Traditional Chinese pastries often use red bean paste as fillings, or an ABC (Air Batu Campur), which is a Malaysian dessert that is very popular in Southeast Asia, uses sweetened red beans on top of shaved ice. (Bee over at Rasa Malaysia has a Ice Kacang/ABC recipe for you if you're interested.) And you might also be wondering why evaporated milk? Evaporated milk is widely used in many Hong Kong style drinks and dessert. I think mainly it's because it's got a longer shelf life than regular milk, and it adds a certain flavor to tea and coffee. It could also because dairy is not consumed in most Hong Konger's daily diet (other than eggs), so regular milk is not very popular.

Besides the three key ingredients, I also added coconut milk which I was very happy with. The trickiest part of this whole operation is to get the ice crashed right. Even thought, I wasn't entirely happy with the consistency of the crushed ice my food processor was producing, I was happy that it was at least getting the job done (if that means processing the ice in batches, and scoop out any big stubborn pieces along the way). WELL. I guess that's why Ice Red Bean isn't usually made at home! It's easier for Hong Kongers to walk down the street from their apartments to get one rather than doing all the mumble jumble which no one ever has the time to.

So there you go. Treat yourself like a Hong Kong local on a hot summer day! (Want it to be more awesome? Top it with a scoop of vanilla ice-cream!)

Iced Red Bean with Coconut Milk (椰汁紅豆冰)

Prep time: 2 hrs 15 mins  Cook time: 5 mins  Total time: 2 hrs 20 mins

Serves: 4, 12oz-glass

You'll need:

  • ¾ cup red beans, raw
  • ½ cup plus 4 tbsp granulated sugar
  • ¾ water
  • 4 cups finely crushed ice (almost close to shaved ice)
  • 1½ cup coconut milk
  • 1½ cup evaporated milk

Approach:

  1. Cook raw red beans for an hour and a half until they become soft, and skin has started to fall apart from the beans. Keep enough water in the pot for at least 1" standing water on top for the entire duration of cooking the beans.*
  2. Drain, and return beans back to the pot. Add ¾ cup of water plus granulated sugar. Let sugar melt on very low heat for 20 minutes. Stir occasionally. Then pour beans on a baking sheet to cool completely, then stick the baking sheet in the freezer until the beans are chilled.**
  3. Mix coconut milk and evaporated milk together. Set aside.
  4. Using a food processor or blender, finely crush the ice.
  5. To assemble, fill ⅔ of the glass with chilled red beans, ⅓ of the glass with crushed ice, fill the glass with the milk mixture.
  6. (Top it with a scoop of vanilla ice-cream!)

Notes:

You may choose to soak the beans overnight, that would cut down on cooking time.

You may choose to pour cooked beans into a big mixing bowl, and let it sit in the fridge overnight.

Singapore-Style Rice Vermicelli (星洲炒米)

I don't just like this dish, I LOVE this dish. In a way, Singapore-Style Rice Vermicelli (星洲炒米) (Singapore rice noodles or Singapore Mei Fun) is part of the identity of Hong Kong cuisine. It's a dish that every Hong Konger is familiar with growing up along with other east-meets-west fusion fairs that you can find in a Cha Chaan Teng. Now, listen, you can't find this dish in Singapore. It's not that they don't eat stir-fried rice vermicelli there (they DO!), it's just not the same thing with the same taste. So why is Singapore-Style Rice Vermicelli (星洲炒米) called Singapore-style rice vermicelli then?

Well, let me take a step back real quick and mention that an authentic Singapore fried rice vermicelli is actually called fried bee hoon which does not include curry, nor it is spicy. Fried bee hoon can be considered as "street food" because it's served in a lot of cooked food centre or food hawkers in Singapore, and it's fast, cheap, and filling (and often eaten as breakfast). Learn how to make economical fried bee hoon from Whisk and Knife.

So... where did the curry come from in most of the Singapore-style rice vermicelli dishes outside of Singapore? I have not been able to find the true answer but many seem to think that the curried rice vermicelli dish was born in Hong Kong's Cha Chaan Tengs. And because it's cooked with curry and it's very similar to fried bee hoon, "Singapore Noodle" was created.

The kind of rice noodle used in Singapore-style rice vermicelli (星洲炒米) should be very thin so Mei Fun (米粉) is used often. I found the Wai Wai brand to be the best when cooking stir-fry noodles because the soaking time is short, and the texture is just right.

I was soaking three pieces of rice vermicelli but two are actually enough for this recipe. Remember to use warm water. I've cut them into halves so they can all be submerged. Plus, it's easier to stir-fry noodles that have been broken up. To save time, soak the dried noodles while you prep for the other ingredients which takes about 15-20 minutes.

Here I have everything cut up and ready to go! Stir-fry happens quickly so you don't want to get held up while things are already getting cooked in the wok. When I was at the store, I saw these small bell peppers so I used them instead of just a red bell pepper. Here I also have half of an yellow onion, 2 cooked and sliced eggs, some char siu, and some minced garlic and grated ginger. If you like to eat spicy, some hot pepper slices would be good, too.

And what can I say? :) I just can't get enough of Huy Fong's chili garlic sauce! It's just the perfect condiment for this singapore style rice vermicelli!

Singapore-Style Rice Vermicelli (星洲炒米)

Prep time: 15 mins  Cook time: 15 mins  Total time: 30 mins

Serves: 2

You'll need:

  • 2 pieces of Wai Wai brand dried rice vermicelli
  • 4 garlic cloves, minced
  • 1 tsp peeled and grated fresh ginger
  • 8-10 medium raw shrimp, shelled and deveined
  • 1/2 lb char siu, thinly sliced
  • 2 eggs, beaten, cooked, and sliced
  • 1 cup of red bell pepper, thinly sliced
  • 1/2 medium yellow onion, thinly sliced
  • a few slices of long hot green peppers

    Sauce:
  • 5 tbsp soy sauce
  • 2 tbsp cooking wine
  • 2 1/2 tsp curry powder
  • 1/2 tsp sugar
  • 1/2 tsp white pepper powder

Approach:

  1. Start by soaking the dried rice vermicelli in a large mixing bowl with some warm water while prepping for other ingredients. You may choose to cut them down in halves, in order for them to be fully submerged.
  2. Mix the sauce together and set aside.
  3. In medium-high heat, drizzle some oil in the pan or wok. Cook the shrimp for about 2 minutes each side then set aside.
  4. Drain the rice vermicelli. (For easier stirring while cooking it with all the other ingredients, you may choose to cut the noodle down roughly. I like it this way also because it’s easier to eat, shorter noodles make better “bite sizes”. But that’s just a completely personal taste.)
  5. Drizzle some oil in the pan/wok. Cook the garlic and ginger until fragrant, then add all the vegetables. Cook for 3-4 minutes until soften or until onion is transparent in color. Set aside.
  6. Drizzle some more oil in the pan/wok. Cook the rice vermicelli until it turns soft, about 3 minutes, then add the vegetable, shrimp, char siu, and eggs. Give it a big stir while adding the sauce. Let it cook for another few minutes until the sauce is all mixed in. Stir frequently.
  7. Serve immediately (with some garlic chili sauce on the side).

Notes:

If char siu isn’t available, try ham, bacon, or shredded pork.[br][br]Here’s a tip I picked up when cooking shrimp: straight shrimp are undercooked, shrimp that have just curled into a C-shape are perfectly cooked, and shrimp that have twisted into an O-shape are overcooked.