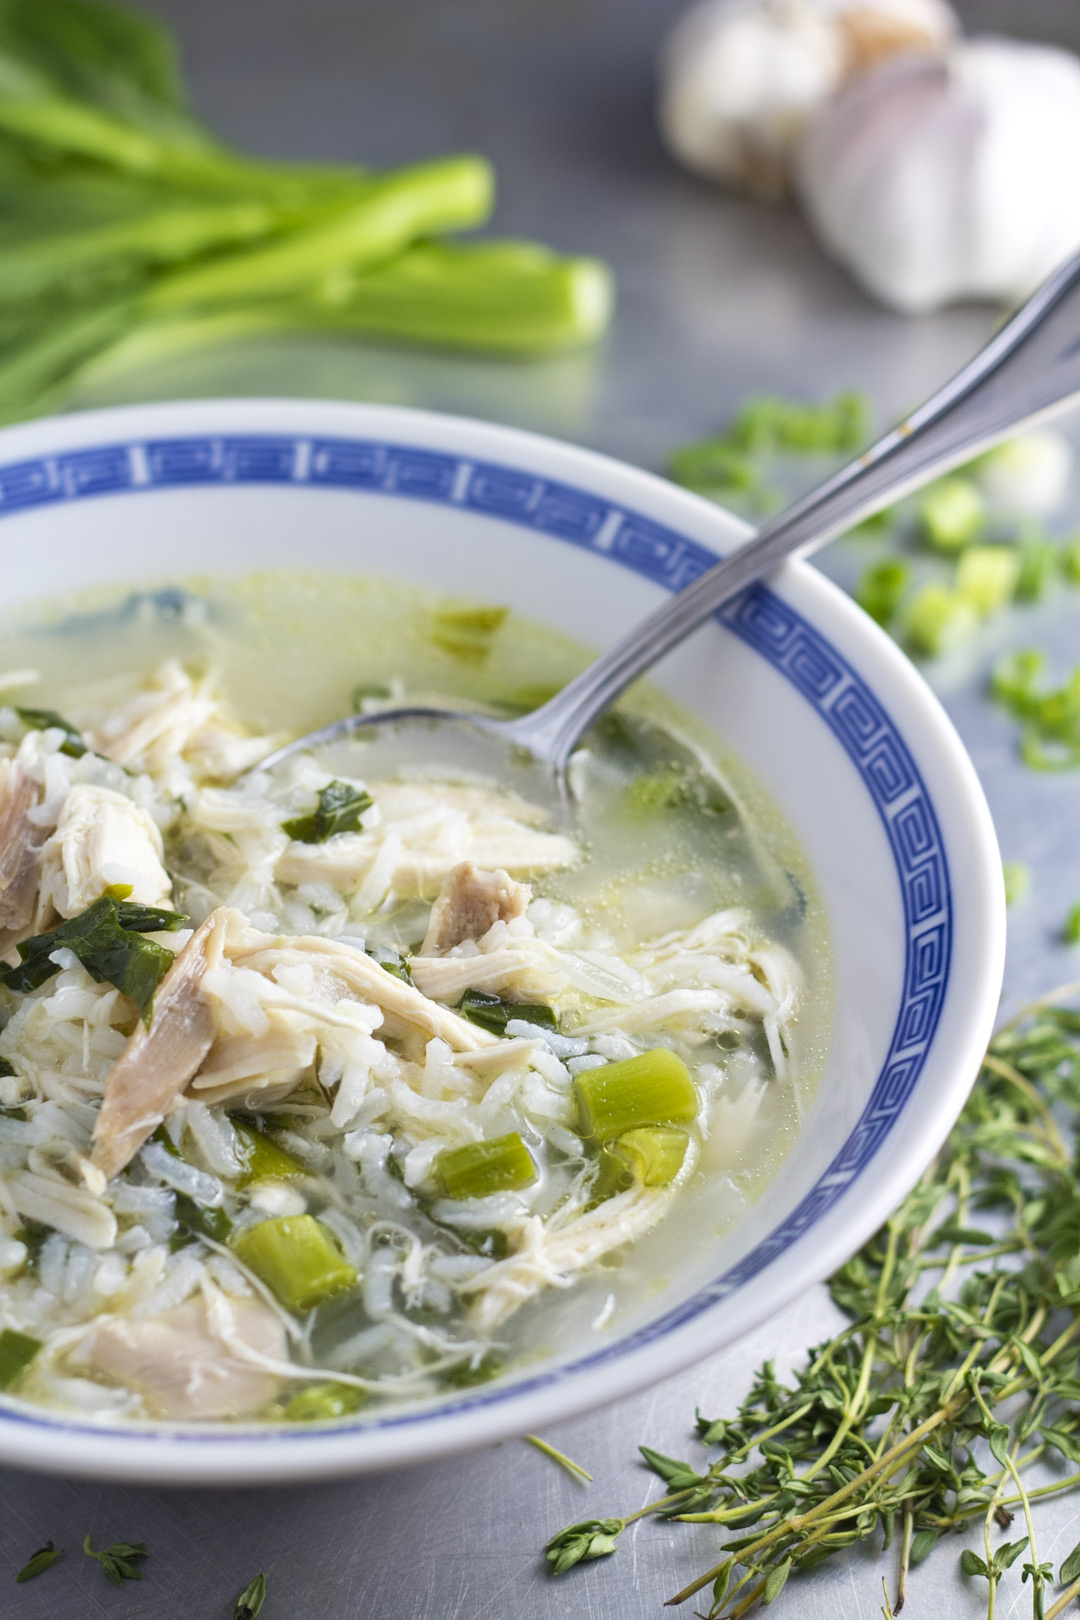
Chicken and Rice Soup with Choy Sum (菜心雞湯飯)

Guys. I'm obsessed. I don't use that word often but for today's post, I just think it's appropriate. Two things that I'm obsessed with for the past three months: A Chef's Life, and chicken and rice.

The PBS show A Chef's Life reminds me a ton of how I grew up in the countryside of Hong Kong. It also reminds me of how my mom used to run our family restaurant back when I was younger as I watched and helped her prep in the kitchen. By learning about the South from an agriculture and lifestyle perspective, I came to realize that the way of life of the Hakkas and people from the South share a lot of things in common. If you remember reading my Hakka heritage post a while back, I talked about the fact that many Hakka families, like mine, were raised around farming and the countryside. I think the South is beautiful and Southerners truly know how to appreciate food because they understand the work that goes into each grain of rice and each slice of meat.

The Hakka cuisine is also very similar to Southern cuisine with lots of fresh, seasonal, hearty, rustic, and flavorful meals. And it is, too, very regional. I've never lived in the South or know all that much about Southern cuisine other than what I've learned on A Chef's Life and Mind of a Chef with Sean Brock so I can't say that the typical ingredients found in Southern cooking are the ingredients used in Hakka cooking but basics are there. I was delighted to learn that many Southern dishes also celebrate pork as much as the Hakka cuisine does.

Lately, I've been taking Vivian's mom Scarlett's chicken and rice recipe and adapting it into a tong faan (湯飯), which means rice soup in Cantonese. When I used to live with my mom, we would have tong faan often because it's just so damn simple and it's so comforting on those cold winter nights. She would save the pot liquid from boiling choy sum (a leafy green in the mustard family), and we'd fill our bowls with rice then pour the hot vegetable broth into the bowls. It's really that simple. And, of course, dinner would be served with a few other dishes as usual. Tong faan isn't something you'd actually get at a restaurant but it's a comfort food that you'd enjoy at home. And don't mistake the Tong faan with congee or rice porridge (jook) which is much thicker and creamier and often eaten as breakfast in many Asian cultures.

Chicken and Rice Soup with Choy Sum (菜心雞湯飯)

Prep time: 30 mins  Cook time: 1 hour 30 mins  Total time: 2 hours

You'll need:

  • 1 organic whole chicken, about 4lbs
  • 3 sprigs thyme
  • 3 bay leaf
  • 2 tbsp salt
  • 1 1/2 tsp white pepper powder
  • 1/2 bulk garlic, peeled and smashed
  • 1 1/2 cups chopped yellow onion
  • 1 1/2 cups white rice
  • 1/2 lb chopped [i]Choy Sum[/i]
  • 3 stalks chopped scallion

Approach:

  1. In a large stock pot, put in the chicken, bay leaf, thyme, salt, and white pepper. Fill water up to one inch above the top of the bird. Cook on medium heat for about 1 hour or until the meat has started to fall off the bone. Turn off the heat and let the bird sit in the broth for another 30 minutes. Remove the whole chicken, and discard bay leaf and thyme.
  2. Debone the chicken and tear the meat into small pieces.
  3. Bring the broth back on medium heat, and add the chopped onion and rice. Let it cook for 8 minutes then add the chicken back in the pot along with the chopped choy sum and scallion. Let it all cook for 5 more minutes until the rice has cooked through but not broken. Stir and check the rice frequently.
  4. Serve immediately.

Notes:

Resist rinsing of the rice as the starch will make the soup richer.

Adapted from Scarlett's Chicken and Rice.

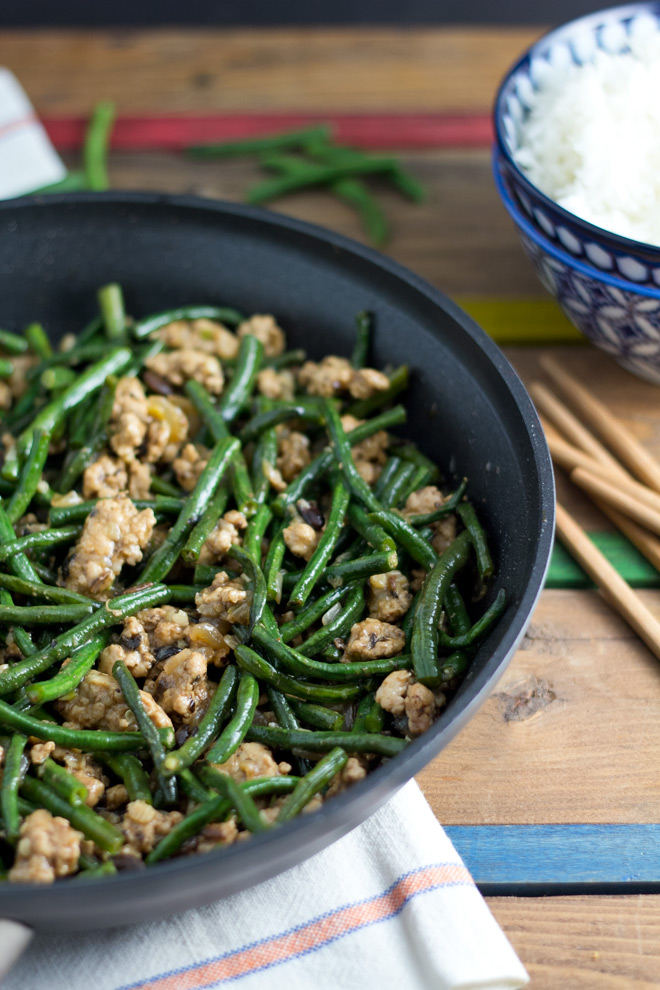
Chinese Long Beans with Ground Pork (豆角炒肉碎)

Remember when I wrote that post a while ago about my Hakka heritage? Well, I kinda promise myself that I'd cook more Hakka dishes for the blog this year, and this Chinese long beans with ground pork is one of them. It's a stir-fry so it's really easy to prep, and you can have dinner on the table in a jiffy!

In Cantonese, we call Chinese long beans "dau gok" (豆角), and they are also known as Yardlong beans (but they're really not a whole yard long, more like half a yard). You can find them at most Asian grocery stores or markets. I've been eating dau gok since I was a kid, and can tell you that Chinese long beans are a little "chewier" and has a stronger green bean taste than regular green beans, they're usually skinnier in thickness, darker in color (although there are a handful of variety and I know there's even purple ones!).

There are a few ingredients that make this Chinese Long Beans with Ground Pork a Hakka dish. The use of pork, soy sauce, and fermented black soybeans called "dau si" (豆豉) in Cantonese. Fermented black soybeans are usually sold dried but sometimes you can also see them being sold in jars which the beans are soaked in liquid/oil. I'm used to the dried kind, and you'd just soak them in water for a few minutes then drain.

Fermented black soybeans are used in a lot of Hakka dishes as they carry a robust flavor that can be added to many hearty Hakka cooking. And if you grew up in a Cantonese household, you would know that a can of "dau si leng yu" (豆豉鯪魚), dace fish and fermented black soybeans, can go a long way with just a bowl of warm rice on those cold winter nights!

This Chinese long beans with ground pork dish, though, it's one of many Hakka dishes that my mom would serve on any given day. It just reminds me of her cooking and sitting at dinner with my family!

Chinese Long Beans with Ground Pork (豆角炒肉碎)

Prep time: 15 mins  Cook time: 15 mins  Total time: 30 mins

Serves: 2-3

You'll need:

  • 1/2 lb ground pork
  • 1 tsp soy sauce
  • dash of white pepper powder
  • 1/2 lb Chinese long beans
  • 1/2 cup chopped onion
  • 1 tbsp minced garlic
  • 1 tbsp dried fermented black soybeans
  • Sauce:
  • 1/4 water
  • 1 tbsp Chinese Shaoxing wine
  • 1 tbsp soy sauce
  • 1/2 tsp sugar
  • 1/2 tsp cornstarch

Approach:

  1. Season the ground pork with soy sauce and white pepper powder. Set aside and let it marinate while you continue prepping.
  2. Rinse, and cut Chinese long beans into 1 1/2" long.
  3. Soak the dried fermented black soybeans in 1/4 cup of water for 5 minutes, then drain.
  4. Mix the sauce ingredients together.
  5. Set a wok or pan over medium-high heat. When the pan is hot, add oil and twirl the pan to spread.
  6. Add garlic and cook until fragrant, about 15 seconds. Then add chopped onion, and cook for 1 minute. Add the ground pork and cook for 3 minutes, then add the fermented black soybeans. Add Chinese long beans and sauce, cover, and let it cook/steam for 3 minutes. Uncover, and cook for another 5 minutes.

Notes:

Adapted from The Hakka Cookbook by Linda Lau Anusasananan.

Chinese Broccoli with Chinese Sausage

Kai Lan (Chinese broccoli) is one of my favorite vegetables! It's a little like broccoli, a little like broccolini, a little like kale and mustard greens. If you were to combine all of the veggies above, you'd pretty much get Chinese broccoli. You've probably seen Kai/Gai Lan on the menu at Chinese restaurants or other Southeast Asian cuisine like Thai or Vietnamese. It's a cold-weather vegetable so fall and winter would be the best season to eat Chinese broccoli (although it's not hard to find year-around, it may be limited at the market during off-season). The literal translation of Chinese broccoli, Kai/Gai Lan, means "mustard orchid" so it is definitely in the mustard greens family. The leaves have a similar thickness and characteristic of kale but tougher. And the stem is a lot like the regular broccoli but bitter. How about broccolini? Part of the family? Yep! The broccolini is a hybrid of Kai Lan and broccoli that the Japanese had married together some years ago.

I remember my mom making this Chinese broccoli with Chinese sausage (Lap Cheong) dish often in the winter in my younger days. And as a picky-eater, this was one of the few dishes that I'd just gobble up along with a bowl of freshly made rice. The drizzle of soy sauce is key! This is definitely a dish that reminds me of those cold nights having dinner with my family.

Do you have a dish that reminds you of winter from childhood?

Chinese Broccoli with Chinese Sausage

Prep time: 15 mins  Cook time: 15 mins  Total time: 30 mins

Serves: 2

You'll need:

  • 1-2 Chinese sausage, sliced, about 4 tbsp
  • 1 tsp olive oil
  • 1 tsp sesame oil
  • 3 garlic cloves, sliced
  • 1/2 lb Chinese broccoli (Kai Lan)
  • 3 tbsp chicken broth
  • 1/4 tsp sugar
  • 1/2 tbsp soy sauce
  • salt and pepper, to taste

Approach:

  1. Rinse and drain Chinese broccoli thoroughly. Cut the leaves roughly, about 1/2". And slice the stems thinly on an angle, about 1/8".
  2. Slice the Chinese sausage on an angle, also about 1/8".
  3. Heat a skillet on medium-high and add olive oil. Twirl the pan around to spread the oil somewhat evenly on the pan. Add Chinese sausage and cook for 3 minutes, until it's turned slightly transparent. Remove from pan into a bowl.
  4. On the same skillet, add sesame oil and garlic. Let it cook until fragrant, about 12 seconds. Add Chinese broccoli and chicken broth, and let it cooking for 4 minutes, stir occasionally.
  5. Add Chinese sausage, sugar, and soy sauce and cook for another 4 minutes.
  6. Plate and serve with rice on the side.

Caramelized Shallots

I respect Anthony Bourdain. A lot. If he's on a show, you bet I'd be watching it. I admire his passion and hard work that all circle around food and culture. So when he mentioned, in one of his books, what makes food at restaurants taste different (and better) than home cooked meals is the magic of caramelized shallots, I had to buy a whole sack of shallots the next day and experience what he's talking about.

I made two jars of caramelized shallots and kept them in the fridge. It was added to almost everything I cooked in the past few days. I topped some on a flatbread (with bacon), added some to sausages, and incorporated some in a beef curry. And I must say, I was not once tired of it. I wanted caramelized shallots in everything I put in my mouth!

To build more flavor, I also tossed in a bulk worth of minced garlic into the shallots. Because why the heck not? If you like to eat well but don't like garlic, then you're not doing it right, my friend! The aroma filled my tiny kitchen and apartment quickly when the shallots were getting sweet and garlicky on the cast iron pan.

I was in one very happy place.

If I were to give you advise when making caramelized shallots, I'd suggest not to dice the shallots too small, use lots of olive oil and some butter, don't worry about it getting a little burnt 'cause that's the good stuff (well, that's how I like it)! And use a cast iron pan because it simply does magic.

Caramelize it. Jar it. Get addicted to it!

Caramelized Shallots

Prep time: 10 mins  Cook time: 15 mins  Total time: 25 mins

Serves: 2, 14-oz jars

You'll need:

  • 20 shallots, diced
  • 1 bulk garlic, minced
  • About ½ cup extra virgin olive oil
  • 3 tbsp unsalted butter
  • salt and pepper to taste

Approach:

  1. In a cast iron pan on medium-low heat, add 3 tbsp of olive oil then add minced garlic. Cook for 1-2 minutes, until it becomes fragrant, then push it to the sides.
  2. Add butter to the pan, and add diced shallots in the center. Sauté until soft and golden, about 10 minutes. Incorporate the garlic into the shallots. Stir occasionally, and add olive oil every now and then to avoid shallots sticking to the pan. Sprinkle salt and pepper, to taste.

Homemade Pickles

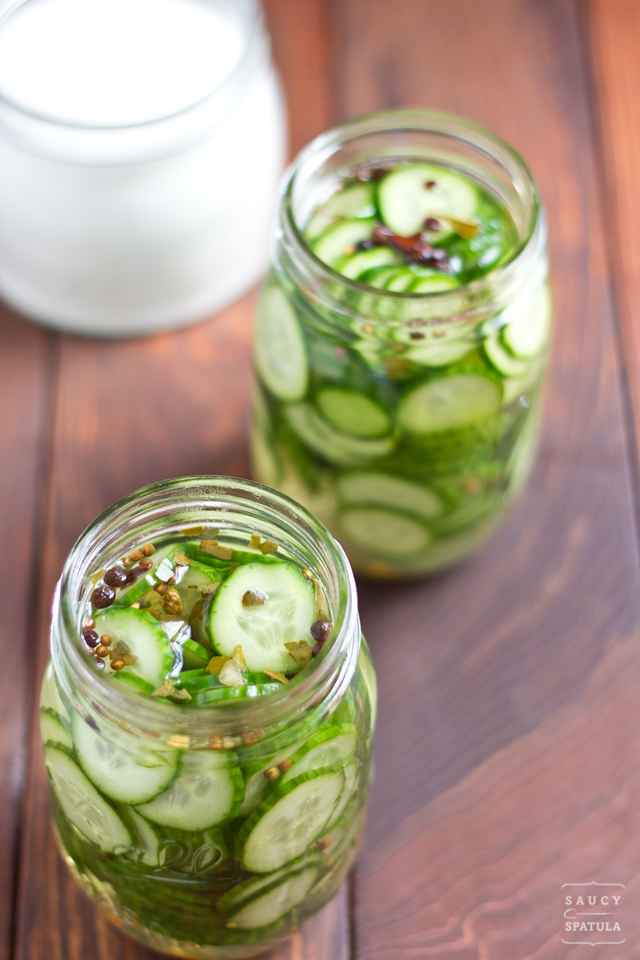
Pickles are quite a staple at our household. We eat them with sandwiches or just something to snack on in between meals. Most of the time, I get store-bought dill pickles but once in a while, I like to make some homemade pickles that is quick and easy.

The technique of pickling is quite an art form that can be traced back thousands of years ago. Almost every culture have mastered their own kind of pickling. Koreans with their kimchi, Chinese with their salted mustard greens, Italians with their giardiniera, Scandinavian with their pickled herring, Middle Eastern with their mekhallel. Pickling sure was big before refrigeration was invented. While I'm fascinated by different kinds of pickling, sometimes I just crave for some simple, homemade pickles!

Coming from a Chinese Hakka background, pickling was a big part of the Hakka cuisine because Hakkas were always finding ways to preserve food as they used to travel for long distances. Then as farmers, Hakkas would save up their surplus food supplies by pickling. Some of the most common Hakka preserved foods are pickled mustard greens, preserved mustard greens, fermented black beans, red fermented tofu, salted radish, and of course soy sauce. My grandfather's favorite Hakka dish, Braised Pork Belly with Red Bean Curd (南乳燜猪肉), uses red fermented tofu.

Okay, back to pickles. Let's start with some kirby cucumbers, shall we?

Using a Mandoline Slicer, choose the thickness to your liking, and slice away! (Please watch your fingers. Pleeeeease!)

I usually let the pickles sit in the fridge for 2 days before serving. It will retain its texture and flavor for up to a week.

Homemade Pickles

Prep time: 2 days 10 mins  Cook time: 5 mins  Total time: 2 days 15 mins

Serves: 2, 16-oz jars

You'll need:

  • 6 kirby cucumbers, about 2 cups
  • 1½ cups water
  • 1½ cups white vinegar (or apple cider vinegar)
  • ½ cup + 2 tbsp granulated sugar
  • ½ tbsp salt
  • 1 tbsp Mccormick mixed pickling spice

Approach:

  1. Using a mandoline slicer, carefully slice all 6 cucumbers.
  2. Place sliced cucumbers into jars, filling almost to the top.
  3. Pour the rest of the ingredients in a small sauce pan, heat on the stove over low heat until sugar and salt has completely melted, then turn off heat immediately. Let vinegar mixture cool completely.
  4. Using a ladle and a funnel (or a ladle with pour spout), fill the jars with the vinegar mixture.
  5. Refrigerate for at least 2 days before serving. Pickles will retain their texture and flavor for about a week.

Singapore-Style Rice Vermicelli (星洲炒米)

I don't just like this dish, I LOVE this dish. In a way, Singapore-Style Rice Vermicelli (星洲炒米) (Singapore rice noodles or Singapore Mei Fun) is part of the identity of Hong Kong cuisine. It's a dish that every Hong Konger is familiar with growing up along with other east-meets-west fusion fairs that you can find in a Cha Chaan Teng. Now, listen, you can't find this dish in Singapore. It's not that they don't eat stir-fried rice vermicelli there (they DO!), it's just not the same thing with the same taste. So why is Singapore-Style Rice Vermicelli (星洲炒米) called Singapore-style rice vermicelli then?

Well, let me take a step back real quick and mention that an authentic Singapore fried rice vermicelli is actually called fried bee hoon which does not include curry, nor it is spicy. Fried bee hoon can be considered as "street food" because it's served in a lot of cooked food centre or food hawkers in Singapore, and it's fast, cheap, and filling (and often eaten as breakfast). Learn how to make economical fried bee hoon from Whisk and Knife.

So... where did the curry come from in most of the Singapore-style rice vermicelli dishes outside of Singapore? I have not been able to find the true answer but many seem to think that the curried rice vermicelli dish was born in Hong Kong's Cha Chaan Tengs. And because it's cooked with curry and it's very similar to fried bee hoon, "Singapore Noodle" was created.

The kind of rice noodle used in Singapore-style rice vermicelli (星洲炒米) should be very thin so Mei Fun (米粉) is used often. I found the Wai Wai brand to be the best when cooking stir-fry noodles because the soaking time is short, and the texture is just right.

I was soaking three pieces of rice vermicelli but two are actually enough for this recipe. Remember to use warm water. I've cut them into halves so they can all be submerged. Plus, it's easier to stir-fry noodles that have been broken up. To save time, soak the dried noodles while you prep for the other ingredients which takes about 15-20 minutes.

Here I have everything cut up and ready to go! Stir-fry happens quickly so you don't want to get held up while things are already getting cooked in the wok. When I was at the store, I saw these small bell peppers so I used them instead of just a red bell pepper. Here I also have half of an yellow onion, 2 cooked and sliced eggs, some char siu, and some minced garlic and grated ginger. If you like to eat spicy, some hot pepper slices would be good, too.

And what can I say? :) I just can't get enough of Huy Fong's chili garlic sauce! It's just the perfect condiment for this singapore style rice vermicelli!

Singapore-Style Rice Vermicelli (星洲炒米)

Prep time: 15 mins  Cook time: 15 mins  Total time: 30 mins

Serves: 2

You'll need:

  • 2 pieces of Wai Wai brand dried rice vermicelli
  • 4 garlic cloves, minced
  • 1 tsp peeled and grated fresh ginger
  • 8-10 medium raw shrimp, shelled and deveined
  • 1/2 lb char siu, thinly sliced
  • 2 eggs, beaten, cooked, and sliced
  • 1 cup of red bell pepper, thinly sliced
  • 1/2 medium yellow onion, thinly sliced
  • a few slices of long hot green peppers

    Sauce:
  • 5 tbsp soy sauce
  • 2 tbsp cooking wine
  • 2 1/2 tsp curry powder
  • 1/2 tsp sugar
  • 1/2 tsp white pepper powder

Approach:

  1. Start by soaking the dried rice vermicelli in a large mixing bowl with some warm water while prepping for other ingredients. You may choose to cut them down in halves, in order for them to be fully submerged.
  2. Mix the sauce together and set aside.
  3. In medium-high heat, drizzle some oil in the pan or wok. Cook the shrimp for about 2 minutes each side then set aside.
  4. Drain the rice vermicelli. (For easier stirring while cooking it with all the other ingredients, you may choose to cut the noodle down roughly. I like it this way also because it’s easier to eat, shorter noodles make better “bite sizes”. But that’s just a completely personal taste.)
  5. Drizzle some oil in the pan/wok. Cook the garlic and ginger until fragrant, then add all the vegetables. Cook for 3-4 minutes until soften or until onion is transparent in color. Set aside.
  6. Drizzle some more oil in the pan/wok. Cook the rice vermicelli until it turns soft, about 3 minutes, then add the vegetable, shrimp, char siu, and eggs. Give it a big stir while adding the sauce. Let it cook for another few minutes until the sauce is all mixed in. Stir frequently.
  7. Serve immediately (with some garlic chili sauce on the side).

Notes:

If char siu isn’t available, try ham, bacon, or shredded pork.[br][br]Here’s a tip I picked up when cooking shrimp: straight shrimp are undercooked, shrimp that have just curled into a C-shape are perfectly cooked, and shrimp that have twisted into an O-shape are overcooked.

Baked Buffalo Cauliflower

These buffalo cauliflower bites are so addicting! Okay, to be honest, I kinda have a love-hate relationship with cauliflower. It's just not a vegetable I grew up eating a whole lot. When I was a kid, my mom cooked more broccoli than cauliflower, and she'd always call them "tiny trees" :) Cauliflower always gives me an impression that it's a very bland vegetable, and I'd need a lot of seasoning when cooking it. But over the years, I've come to appreciate this white, soft, and comforting food.

Break (cut) them into small bite pieces.

Then coat each one with batter.

Line them on a baking sheet.

You'll basically bake these buffalo cauliflower bites twice – once to cook the breading, and once to add more flavor and color to them. It's really as simple as 123, eh?

Now, the next time you're needing to make a finger food that's healthy, tasty and flavorful, you know what to do ;)

Baked Buffalo Cauliflower

You'll need:

  • 1 head of cauliflower
  • 1½ cup flour
  • 1½ cup water
  • 4 tbsp of hot sauce
  • salt and pepper
  •  

Buffalo sauce:

  • 3 tbsp of hot sauce
  • 3 tbsp of olive oil
  • salt and pepper
  •  

Yogurt dipping sauce:

  • 4 oz plain Greek yogurt
  • ½ tbsp olive oil
  • ½ tsp Italian seasoning
  • *you may also use fresh dill/basi

Approach:

  1. Preheat oven to 450°F.
  2. Line baking sheet with parchment paper, and brush some olive oil on top lightly.
  3. Break cauliflower into small pieces (bite sizes).
  4. Mix batter by combining the flour, water, hot sauce, and salt and pepper.
  5. Mix the buffalo sauce by combining hot sauce, olive oil, salt and pepper, then set aside.
  6. Coat each piece of the cauliflower with batter, then lay them on the baking sheet and bake for about 15 mins.
  7. *Consider using chopsticks for coating and transferring from bowl to baking sheet.
  8. Let them cool for 5 minutes, then transfer them into a mixing bowl.
  9. Drizzle the buffalo sauce and toss lightly.
  10. Transfer them back on the baking sheet, and bake for an additional 5 minutes.
  11. For dipping sauce, combine all ingredients and mix well.

Butternut Squash Carrot Ginger Soup

Last weekend, I had dinner at Lola BKLYN with a couple of friends. I had a heavy lunch that day so I wanted something light, and that's when I had this Butternut Squash Carrot Ginger Soup for the first time. Lola BKLYN is restaurant in Fort Greene mainly focuses on American cuisine. It's got a sister restaurant close by called Chez Oskar, which offers great French dishes. Both restaurants have a causal atmosphere, and the food is just phenomenal.

Butternut Squash Carrot Ginger Soup. It's super easy to make and you really don't need a whole lot of ingredients (hint the name of the soup). Besides the ingredients, you will need a blender. That will do the second half of the cooking for you. You also don't need a whole lot of cooking skills either, as long as you know how to chop and make sure you don't forget to put the lid on the blender. Everything else would be simple to handle with one eye closed.

Butternut Squash Carrot Ginger Soup

Servings: 2-3 quarts

You'll need:

  • 1 medium onion a few cloves of garlic
  • 1 butternut squash
  • 6 carrots
  • 6 cups of low-sodium vegetable broth (chicken broth works too)
  • 3 tbsp of grated ginger salt & pepper, to taste
  • 1/2 tsp ground nutmeg
  • 1-2 tsp of dried or fresh thyme
  • optional: 1 block of medium firm tofu, 14 oz

Approach:

  1. Chop onion, butternut squash, and carrots. Then mince garlic, and grate ginger.
  2. Pour some olive oil in a dutch oven or stock pot. Add onion and garlic, cook until onions are soft.
  3. Add chopped butternut squash, and carrots, cook until everything is tender or when you're able to poke through the squash with a toothpick.
  4. Add broth and seasoning, and bring that up to a boil.
  5. Let the soup sit for 5-10 minutes. Meanwhile, set up your blender.
  6. In parts, blend the soup until smooth. *You'll need another big pot or container to pour the puréed soup.
  7. Take tofu block out of the plastic container. Use a couple paper towels, gently squeezed out some of the water.
  8. Cut the tofu block in small cubes, then add to soup and stir gently.

Kimchi Fried Rice

Total comfort food – Kimchi Fried Rice / Kimchi Bokkeumbap (김치볶음밥). I can just eat kimchi with a big bowl of rice – lunch or dinner – and I'd be perfectly happy. Good kimchi is never hard to find (at least in New York). Unless you are Korean, then your home will always have homemade (and unique) kimchi. I usually get a jar of it from the store and that works for me just fine.

I honestly don't know a whole lot about kimchi. I'm not sure if there's much more to know about other than the fact that it is: fermented napa cabbage, other vegetables, and LOTS of seasonings; can be paired or made with other Korean dishes; a staple to have in a home; something that every Korean mom can make very well; and yes, spicy.

Kimchi fried rice is just too darn easy to make and enjoy. I don't know why I haven't been making it more often. Have you tried kimchi fried rice? or kimchi pancake? or kimchi sushi?

Kimchi Fried Rice

Prep time: 10 mins  Cook time: 12 mins  Total time: 22 mins

You'll need:

  • 3 cups of day-old rice
  • 3 tbsp of olive oil
  • 3 scallions, chopped, white and green parts separated
  • 1 1/2 cups of kimchi, chopped roughly
  • 2 tbsp soy sauce
  • 1 tbsp sesame oil
  • fresh ground black pepper
  • 1 egg
  • some shredded nori

Approach:

  1. In a large mixing bowl, drizzle olive oil on the rice and stir.
  2. Chop scallions, separate the white and the green parts.
  3. Chop kimchi roughly, or use a pair of scissors and cut the kimchi in a bowl.
  4. In medium heat, fry the egg, sunny side up. Set aside.
  5. Pour some olive oil onto the same pan, toss in the white scallion. Cook until fragrant, about 1 minute.
  6. Add the kimchi and cook for about 3 minutes, then add the rice. Stir to combine.
  7. Add the soy sauce, sesame oil, black pepper, and the green scallion. Cook for an additional 5 minutes.
  8. Serve with the sunny side-up-egg, and top with some shredded nori.

Corn Bread Pudding

Here is a side dish to die for – Corn Bread Pudding. It's so good, I could eat it everyday. It's super easy to make, share, pack, and re-heat. The recipe is also very versatile – try throwing in some jalapeño or pepperoni. Be adventurous!

Check out my other favorite Thanksgiving recipes:


Corn Bread Pudding

Servings: 8

You'll need:

  • 1 16oz sour cream
  • 4 eggs
  • 2 cans of cream corn
  • 2 cans of regular corn, drained
  • 2 boxes of Jiffy corn muffin mix
  • 1 stick unsalted butter, melted
  • 1 cup shredded cheddar cheese

Approach:

  1. Preheat oven to 350°F.
  2. Start with sour cream, beat in eggs, then add the cream corn and regular corn.
  3. Mix in the Jiffy corn muffin mix.
  4. Pour mixture into a 9x13 baking dish.
  5. Pour melted butter on top of the mixture, and bake for 1 hour.
  6. Spread some shredded cheddar cheese on top and bake for another 10 minutes for the cheese to melt.

Green Beans and Walnuts with Lemon Vinaigrette

This green beans recipe blew everyone away on Thanksgiving! It's refreshing and the lemon vinaigrette made the dish light among other heavier traditional dishes.

Check out my other favorite Thanksgiving recipes:


Green Beans and Walnuts with Lemon Vinaigrette

Servings: 8

You'll need:

  • 1 lemon
  • 1 teaspoon Dijon mustard
  • 1/3 cup olive oil
  • salt and pepper to taste
  • 1 1/2 pounds green beans, trimmed
  • 2/3 cup walnuts, toasted, coarsely chopped

Approach:

  1. Remove peel from lemon with vegetable peeler and cut into very fine strips.
  2. Cut lemon in half. Squeeze enough juice to measure 2 tablespoons; transfer to small bowl. Whisk in mustard, then oil. Season with salt and pepper.
  3. Cook green beans in pot of boiling salted water until crisp-tender, 5 to 6 minutes. Drain; pat dry. Combine beans, walnuts, and lemon peel strands in large bowl. Add dressing; toss to coat. Season salad to taste with salt and pepper and serve.

This recipe is adopted from Bon Appetit.